Showing posts with label marshmallow. Show all posts

Monday, March 24, 2014

Peeps Barrel Cake


I could not resist making this cake.  Peep revolution!  Peeping ain't easy people!  Hahahahhaah.

Any cake and frosting will really do for a barrel cake.  I went with two chocolate cookie layers and marshmallow buttercream frosting.  I also played around with some caramel sundae syrup...a little too thin for what I was looking for but it was tasty.


Peeps Barrel Cake

Cookie Cake:
1 3/4 cups flour
1/3 cup cocoa powder
1 tsp salt
1 tsp baking soda
3/4 cup brown sugar
3/4 cup sugar
1 cup butter
1 tsp vanilla
2 eggs
2 cups semi sweet chocolate chips
1/4 cup water (optional....in case batter is too thick)
15 packs or so full size Kit Kats
Peeps

Cream butter, sugar, and brown sugar together.  Add in eggs and vanilla.  Mix in remaining dry ingredients.  Add water if necessary to thin batter a bit.  Fold in chocolate chips.  Divide batter between two 9 inch round pans lined with parchment.  Bake at 375 for 15 to 20 minutes or until cookie is done.  Remove cookies to racks to finish cooling.

Marshmallow Buttercream Frosting:
1 cup butter, softened
2 to 3 cups powdered sugar
1 jar marshmallow cream
caramel sundae syrup

Beat butter and marshmallow cream together.  Add powdered sugar until the desired spreading consistency is reached.  Divide out about 1/3 of the frosting into another bowl.  Stir in 2 tbls to 1/4 cup caramel syrup.  Add additional powdered sugar if the frosting has thinned too much.

Place one cookie layer on cake plate.  Top with caramel flavored frosting.  Drizzle with caramel syrup and then top with second cookie layer.  Use remaining frosting to cover the entire cake.  Divide Kit Kats into sections and press gently, with the logo side in, around the cake to form the barrel.  Drizzle additional caramel syrup across the top of the cake.  Top with Peeps.  Wrap a ribbon around the cake and it is ready to go.  Chill until ready to serve.


Thursday, July 28, 2011

Cherry Chocolate Chip Cookie Cake


This cake fell more into the category of hot mess than epic win.....I will comfort myself with the fact it tasted good...ehehehehe.  It should actually be a three tiered cake.  There was an "incident" that left me short one tier.  Momma didn't name me Grace for a reason....snicker.

So I decided to try making some marshmallow cream for my frosting.  I've made marshmallows.....a little adjusting of the recipe and I should be able to get a cream easy peasy.  Simple, right?  Simple until I over thought it.  I was going to halve the gelatin, but 1 1/2 envelopes gelatin didn't seem very tidy so I went with 2 envelopes...which was still on the firm side.  It wouldn't have mixed easily with the cream cheese to form a smooth frosting....which led to tinkering.  The end result was useable and darn tasty, but not the firm frosting I was shooting for.

I did have a neat mix of textures in the cake.  The firm chocolate garnish, creamy frosting, dense cookie layers with mini chocolate chips that gave it a bit of a crunch.


Cherry Chocolate Chip Cookie Cake

1 3/4 cup unbleached all purpose flour
1/3 cup cocoa
3/4 cup sugar
3/4 cup brown sugar
1/2 tsp salt
2 tsp soda
2 eggs
1 tsp vanilla
1 cup butter
1 cup mini semi sweet chocolate chips
1/2 cup dried cherry cranberries

Beat butter and sugars together in a bowl.  Add in eggs and vanilla.  Mix in flour, cocoa, baking soda, and salt.  Fold in chocolate chips and dried cranberries.

Divide dough into thirds and spread into greased 8 inch rounds.  Bake at 350 for 12 to 15 minutes, or until done.  Cool.


Cherry Marshmallows

1 cup water
2 1/4oz envelopes unflavored gelatin
2 cups sugar
2/3 cup corn syrup
1/4 tsp salt
1 pk Black Cherry Kool-Aid

Pour 1/2 cup water into a large bowl.  Mix Kool-Aid into water.  Sprinkle gelatin over water.  Let this mixture sit while you cook the syrup.

Combine 2 cups sugar, corn syrup, salt, and remaining 1/2 cup water in a saucepan. Stir over medium heat until sugar dissolves.  Boil, without stirring, until syrup reaches 240°.

With mixer on low speed, carefully pour hot syrup into gelatin mixture in a slow, thin stream.  Gradually increase speed to high and beat until mixture is very thick.  Let stand for a while to set up.


Icing:

Cherry Marshmallows
1/4 cup butter
4 cups powdered sugar
12oz milk chocolate, melted
16oz reduced fat cream cheese

Heat the marshmallows and the butter together in the microwave until smooth.  Beat in cream cheese and melted milk chocolate.  Add in powdered sugar, one cup at a time.  Chill frosting.

Place one cookie round on a plate.  Spread frosting across top and place a second round over the frosting.  Spread frosting across top and add final round on top.  Frost top and sides of cake.  Garnish with additional melted chocolate.


Never take pictures outside when it's the surface of the sun hot.  My chocolate went instantly melty and my frosting.....already less firm than I wanted....slid a bit.


A bit of a slump to this piece of cake...where's my cake eating blindfold?  I don't want to spoil my enjoyment of good cake by being critical of the view.  ;)

Thursday, July 21, 2011

Root Beer Float Fudge Sauce


Most fun flavor of fudge ever!  I ran across this recipe over at Mel's Kitchen Cafe.  I was lazy and didn't beat the fudge long enough to turn it into a thick, solid fudge, but it makes a wonderful topping for ice cream.  The one thing I've always loved about a fudge not turning out quite right....it's never wasted.

Heating the fudge slightly to pour over ice cream does make the marshmallows a little sticky....no stubborn marshmallows will keep me from my fudgy glory!


Root Beer Float Fudge Sauce

4 cups sugar
1/2 cup light corn syrup
1 1/2 cups non fat evaporated milk
1 tsp salt
1 tsp vanilla
2 tsp root beer extract
2 1/2 cups mini marshmallows

In a large saucepan, combine the sugar, corn syrup, evaporated milk and salt. Cook over medium heat, stirring constantly, until the mixture reaches 236 degrees on a candy thermometer. Remove the saucepan from the heat and stir in the vanilla and root beer extracts.

Pour the mixture into a 9X13-inch baking pan (you’ll be mixing it again later). Leave the pan undisturbed to cool at room temperature for about an hour.  Pour the mixture into a large mixing bowl and mix on medium speed until fudge thickens.  Stir in the mini marshmallows and stop mixing.

Pour mixture into mason jars and let fudge sauce finish cooling before tucking jars away in the fridge.


Monday, May 2, 2011

Giant S'more

I'm still giggling over this treat....seriously...it's a giant s'more...how can you not love it?

I used the marshmallow recipe I found on sweets by sillianah's blog. I did make a plain version instead of matcha.  Wonderful recipe.  I had zero problems and the marshmallows turned out to be way easier to whip together than I expected.

The graham crackers I found here at allrecipes.  I did tinker a bit with that one.  The dough was suppose to be chilled before doing anything with it....I was short on time so I tossed that requirement out the window.  ;)

These are horribly addictive.  I loved these as is, but they can be heated for a short bit in the microwave if you want a melted, gooey effect....ok....now I really wanted one heated up.


Giant S'more

Marshmallows:

1 cup water
3 1/4oz envelopes unflavored gelatin
2 cups sugar
2/3 cup corn syrup
1/4 tsp salt
2 tsp vanilla

Line 9x13 pan with foil and spray with some Pam.

Pour 1/2 cup water into a large bowl.  Sprinkle gelatin over water.  Let this mixture sit while you cook the syrup.

Combine 2 cups sugar, corn syrup, salt, and remaining 1/2 cup water in a saucepan. Stir over medium heat until sugar dissolves.  Boil, without stirring, until syrup reaches 240°.

With mixer on low speed, carefully pour hot syrup into gelatin mixture in a slow, thin stream.  Gradually increase speed to high and beat until mixture is very thick and stiff. Add the 2 tsp vanilla and beat just to blend.

Pour marshmallow mixture into pan. Let stand uncovered at room temperature until set, about 4 hours.


Graham Crackers

2 cups white whole wheat flour
1 cup unbleached all-purpose flour
1 tsp baking powder
1/2 tsp baking soda
1/4 tsp salt
3/4 cups butter
1/2 cup brown sugar
1/3 cup raw honey
1 tsp vanilla
1/2 cup milk

Cream together the butter, brown sugar and honey.  Mix in all-purpose flour, baking powder, baking soda, and salt.  Mix in milk and vanilla.  Add in whole wheat flour.  Divide dough into thirds.

Line a 9x13 pan with waxed paper.  Press 1/3 of the dough into the pan to create an easy rectangle.  Lift the waxed paper out and flip the dough onto a greased cookie sheet.  Repeat with another third of the dough.  (The dough can be rolled into a rectangle instead of being pressed into a pan.)  Using a pizza cutter zip three lines/breaks through your cookies.  I used a skewer to form the holes in the cookie.  The remaining third of the dough you can save for later or roll out into cookies for snacking.

Bake at 350 for 15 minutes or so until the cookies are lightly browned around the edges.  Cool.


Chocolate:
14oz non fat sweetened condensed milk
12oz milk chocolate chips
1 tsp vanilla
 
Mix together sweetened condensed milk, chocolate chips, and vanilla. Heat on high in the microwave for 30 second intervals, stirring after each interval until mixture is melted and smooth.

Flip one of the cookies face down on a platter.  Spread half the melted chocolate across the cookie.  Chill the cookie for a few minutes to set the chocolate.  Remove your marshmallow by the foil from the pan.  Flip the marshmallow on top of the chocolate.  Spread remaining chocolate across the marshmallow.  Top with remaining cookie.  Slice into squares and nom!


Yes....this is a 9x13 S'more.  As much as it goes against my grain....I shared the love with others.  ;)


A little assembly action....the chocolate will spread just a bit so be careful how close you come to the edge.  It's not critical to chill the chocolate after this step....but letting the chocolate cool will prevent an unwanted squished effect when multiple layers are piled on top of this one.  ;)

Monday, December 13, 2010

So So Minty Christmas Tree Treat

This goody is super easy to whip together and great fun to decorate.  A very kid friendly treat.  Just think....the need for colorful decorating material gives you a reason to haunt the holiday food section of the grocery.  ;)  So much minty good flavor...it was heavenly.  Every winter I get this mad craving for mint, so this hit the spot.  Now if I can just find another bag of the Nestle Dark Chocolate & Mint chips I will be a happy camper.

This is a twist on the usual Rice Krispies treats....since I was doing a chocolate theme I could have used Cocoa Krispies come to think of it.  The measurements are a little loose...but honestly it's Rice Krispies treats you really can't go wrong zipping those together...ehehehe.   Pssst....I used the store brand of cereal instead of Kellogg's...a sin I know.

I realized after I finished attaching all the mini mints that I could have used them to make a pretty garland look instead of random ornaments....hindsight and all that. You can use whatever you like for decorations....crushed candy canes, holiday M&M's, ect.


Minty Christmas Tree

1/2 bag Jumbo Marshmallows
2 tbls tub margarine
1/2 box Rice Krispies
12oz bag Dark Chocolate and Mint Chips
1 tbls shortening
Mini Mints for garnish

Melt the marshmallows and the margarine in the microwave, stirring often so you don't overheat it.  In a separate bowl, melt 6oz of the chocolate and mint chips in the microwave.  When the chips are melted and smooth add them to the melted marshmallows.  Mix in the cereal.

Pour the cereal mixture out onto a wax paper lined cookie sheet.  Form it into a rough Christmas tree shape.  Using a piece of waxed paper to keep the mixture from sticking to your hand, press the mixture together more firmly and finish shaping it.

Melt the remaining 6oz of dark chocolate and mint chips and shortening in the microwave.  Spoon the chocolate over the tree and spread it around to get a nice coating.  Chill for 30 minutes to an hour to set.  Remove from fridge and decorate.  You can use some of the leftover chocolate (or melt some extra) to pipe garland ropes...though don't pipe it as narrowly as I did since it blended right in.  Attach your mini mints using a little dab of melted chocolate on the back of the pieces to hold them in place. Chill for another 30 minutes to set and then nosh.


A few more pics....
With this treat you don't really have to worry about a smooth coat of chocolate....the rough look suits it quite nicely.  ;)  If you decide to pass on piping on any melted chocolate garland you could probably skip the step where you let this chocolate coating set up in the fridge.  The chocolate top will hold the pieces in place and you won't have to dip your decorations in a little bit of melted chocolate.  The only drawback to doing it this way is trying to place any decorations on the sides of the tree...you could get some slippage.  When you are working with a chilled coating and using dabs of melted chocolate as glue you pretty much get insta bond and your pieces will be locked into place.


A little post shaping picture....it's super easy to give it a nice tree shape.  Compacting the cereal mixture down will also give you an easier surface to work with when you cover it in chocolate.  Instead of one large tree, you could actually do a series of mini trees....which would be quite cute and you wouldn't need to cut servings.

Tuesday, September 21, 2010

Molten S'more Brownies

Heaven.....absolute....drenched in melted fudge and marshmallow....heaven. You don't have to heat the brownie to get the delightful pool of melted fudge and marshmallow, but then I would have to give you the hairy eyeball if you don't. ;) Honestly you have to love a dessert that tempts you to lick the plate....only when no one else is in the room of course....and then deny you would ever do such a thing. Never you mind how that smudge of chocolate got on my forehead!

This dessert makes me think a MoonPie, brownie, and s'more had a rumble and this was the end result. I so will be making this again. I wants it!


Molten S'more Brownies

Brownie Layer:
1/2 cup tub margarine
2 squares (2 oz) unsweetened chocolate
1 cups sugar
2 eggs
1 cups flour
1 tsp vanilla

Melt margarine and chocolate together in the microwave. Stir often and be careful not to overheat. Add in sugar and vanilla Beat the eggs lightly in a small bowl before adding them to the chocolate mixture. Stir in flour. Pour into a greased 8x8 pan and bake at 350 for 12 to 15 minutes. Be careful not to overbake. Cool.

Fudge Filling/Sauce:
14oz non fat sweetened condensed milk
6 oz milk chocolate chips
6 oz semi sweet chocolate chips
1 tsp vanilla
8 large marshmallows
1/4 cup non fat evaporated milk

Mix together the sweetened condensed milk, milk chocolate chips, semi sweet chocolate chips, and vanilla. Microwave mixture at 30 second intervals, stirring after each one until the chocolate is smooth. Let the mixture cool. You can pop the fudge into the fridge if you are in a hurry.

Meanwhile, cut your cooled brownies into 16 squares. Cut each square in half, making two layers. Cut the marshmallows in half and flatten them. Put a flattened marshmallow in the center of each bottom brownie layer.

Spoon some cooled fudge into a ziplock bag (a pastry bag would be fine) and cut off a corner to make a good sized opening. Squeeze fudge around the crushed marshmallows...you want a fairly even center layer flush to the edge of the brownie. Put the top layer of the brownie over the marshmallow/fudge layer and press lightly.

Take the remaining fudge...you may need to reheat it slightly if it's become too thick....and stir in the evaporated milk to thin it to more of a glaze. (You can also use regular milk.) Add extra milk if needed. Pour the thinned fudge over the brownies, making sure to drizzle the chocolate down the sides. You can scoop up the extra chocolate that pools around the brownies and spread it along the sides. Chill brownies until ready to serve.
To get the lovely molten effect....microwave your brownie for 10 to 20 seconds before noshing.


A few more pics of the glory...
A look at a finished brownie before I popped it into the microwave to heat. You could eat it now of course......but how can you resist melted, gooey chocolate and marshmallow?

Taste testing in the name of quality control! That's my story and I'm sticking to it. ;) It was tough to get a good picture of the marshmallow oozing out....probably due to the fact I was busy noshing at the time ehehehe.

Thursday, July 1, 2010

Chocolate Marshmallow Squares


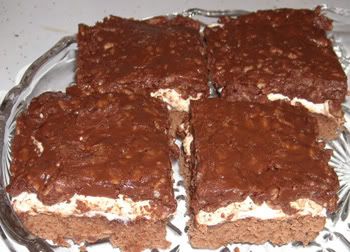
I found this gem in a Taste of Home cookbook and it is wonderful! It really does remind me of a Mississippi Mud style recipe. There is a wonderful mix of textures with the soft cake, gooey marshmallow center, and hard chocolate topping. These squares are high on my list of favorite goodies.


Chocolate Marshmallow Squares

3/4 cup tub margarine
1 1/2 cups sugar
3 eggs
1 tsp vanilla
1 1/3 cups flour
3 tbls cocoa
1/2 tsp baking powder
1/2 tsp salt
4 cups mini marshmallows

Topping:
1 1/3 cups chocolate chips
1 cup natural creamy peanut butter
3 tbls tub margarine
2 cups crisp rice cereal

Cream margarine and sugar. Add in eggs and vanilla. Add flour, baking powder, salt, and cocoa to mixture. Spread in greased 9x13 pan and bake at 350 for about 20 to 25 mins or until cake tests as done. Spread marshmallows evenly over cake and return to oven to 3 mins. Spread melted marshmallows around with a butter knife. Cool.

For topping combine chocolate chips, peanut butter, and margarine in saucepan. Cook over low heat until melted. Remove from heat and stir in cereal. Spread over bars and chill.

Tuesday, June 29, 2010

S'mores Cheesecake Bars

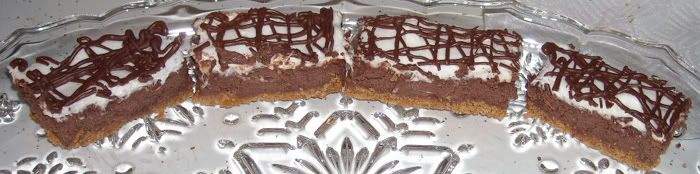
I ran across this recipe here and it really appealed to me. I just had to try it out with just a tiny adjustment here and there. Who can resist something with S'more in the title....honestly! ;)

S'mores Cheesecake Bars

Crust:
1 sleeve graham crackers, processed into crumbs
1 tbls sugar
1/4 cup tub margarine, melted

Combine the graham cracker crumbs, sugar and melted margarine in a small bowl. Press the mixture in an even layer into the bottom of greased 8x8 baking pan. Bake 10 minutes at 350.

Cheesecake Filling:
6 oz. semisweet chocolate chips
8 oz. reduced fat cream cheese
1/4 cup fat free sour cream
1/2 cup marshmallow cream
2 tsp. dark cocoa powder
1 tsp. vanilla
2 large eggs
2 1/4 cups mini marshmallows
milk chocolate chips for drizzle topping

In a small bowl melt semi sweet chocolate chips in the microwave. Be careful that you don't overheat the chocolate. Set aside. In another bowl mix together the cream cheese, sour cream and marshmallow cream until well combined. Blend in the cocoa powder, vanilla extract and eggs until incorporated. Stir in the melted chocolate. Pour the filling over the graham cracker crust and spread out evenly. Bake about 30 minutes at 325, or until the center is just set.

Evenly top the cheesecake layer with the mini marshmallows. (You want a nice thick layer of marshmallows.) Return to the oven for 2-3 minutes until the marshmallows are melted slightly. Remove from oven and spread the marshmallows around with a butter knife. Cool cheesecake.

Melt milk chocolate chips in microwave. Be careful that you don't overheat the chocolate. Drizzle chocolate across the top of the marshmallow layer. I used a ziplock bag with a corner cut off as a quick pastry bag to do the drizzle. Chill cheesecake before serving.